AI Agent Stack, Module 04: MCP, One Connector Any Host Can Use
2026
The tools from Module 02 only work inside the app that defines them. MCP (Model Context Protocol) moves them into a small server that any MCP-capable app can discover and call. This guide sets up Module 04 of the AI Agent Stack repo, runs it, and follows one MCP session from start to finish.
In the AI Agent Stack overview, I compared the six building blocks people mix up: APIs, tools, RAG, MCP, plugins and skills. Module 01 set up the issue tracker API, Module 02 turned it into tools a model can call, and Module 03 grounded answers in the team’s docs. This post covers the next module: github.com/likarajo/ai-agent-stack/tree/main/04-mcp.
Same issue store, same question. The new part is the plug: a standard way to connect the tools, so you write them once and reuse them across apps.
Watch the video
1. What it is
MCP is an open protocol that standardizes how AI apps connect to outside tools and data. A common comparison is USB-C: build the connector once, and any compatible host can use it.
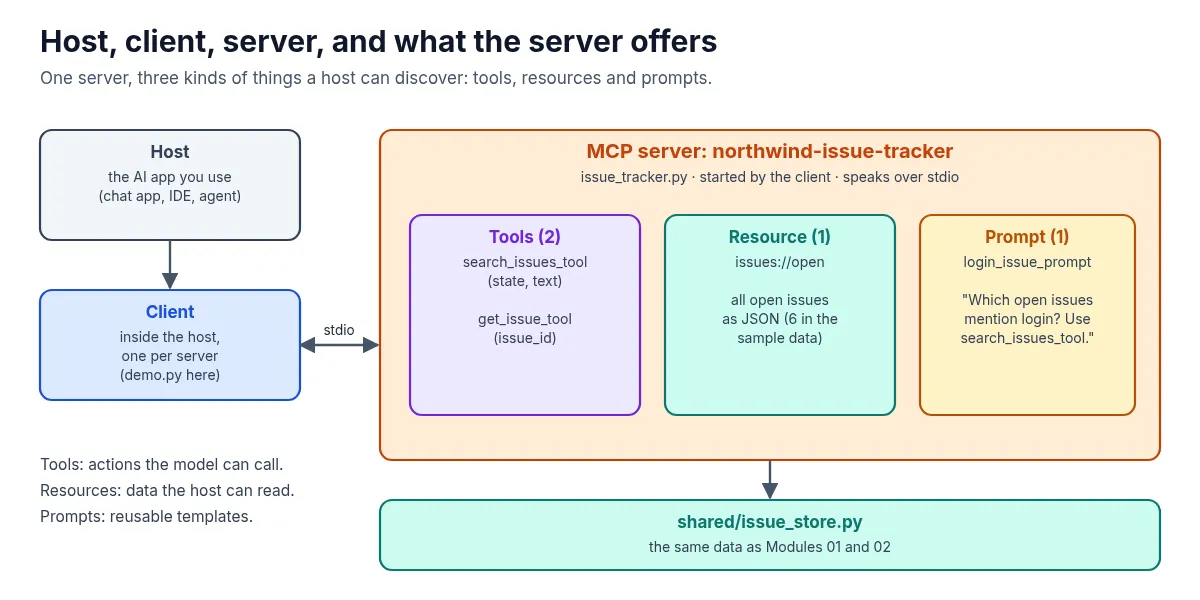
There are three roles:
| Role | In this module |
|---|---|
| Host | The AI app you work in (a chat app, an IDE, an agent). Here there isn’t one; the demo client stands in. |
| Client | Lives inside the host and talks to one server. Here it’s 04-mcp/client/demo.py. |
| Server | Wraps a real system and describes what it offers. Here it’s 04-mcp/server/issue_tracker.py. |
The server offers three kinds of things: tools (actions the model can call), resources (data the host can read) and prompts (reusable templates).
2. Why it matters
MCP doesn’t replace tool calling. It standardizes how tools are found and called. In Module 02, the tool schemas lived inside one app. If a second app wanted the same tools, you’d copy the schemas and the code. With MCP, the server describes its own tools, and any host that speaks MCP can list them and call them.
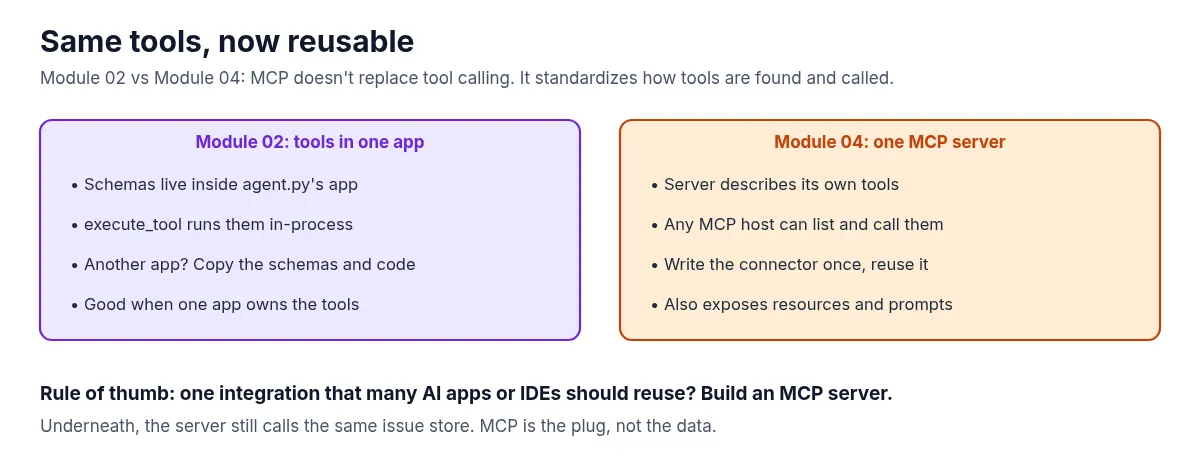
That gives the rule of thumb for this module: one integration that many AI apps or IDEs should reuse? Build an MCP server. If only one app will ever use the tools, plain tools from Module 02 are simpler.
3. The running example
The question is the same as in Modules 01 and 02: “Which open issues mention login?”
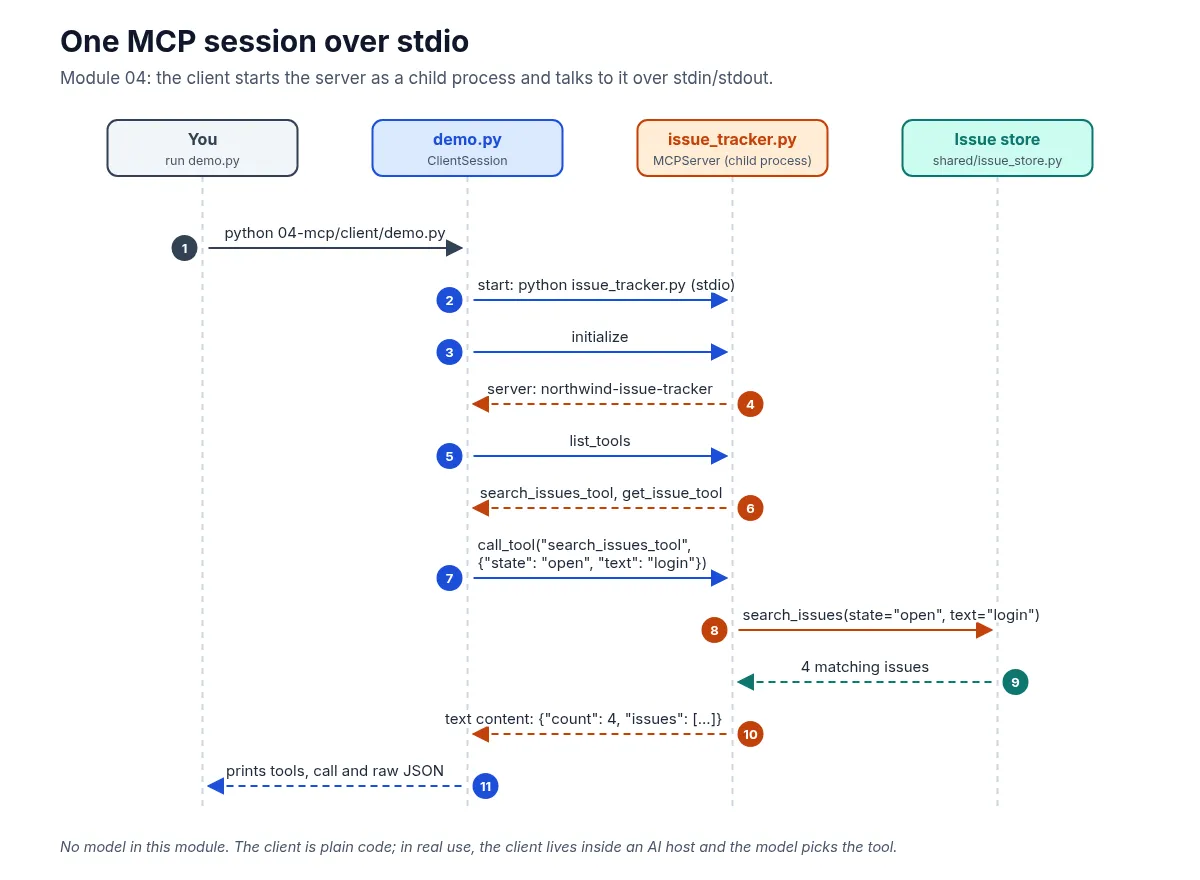
This time it’s an MCP tool call: call_tool("search_issues_tool", {"state": "open", "text": "login"}). The server runs it against the shared issue store and returns the same four open issues: 101, 102, 105 and 107.
There’s no model in this module. The client is plain code that always makes this one call, so you can see the protocol on its own. In a real host, the client would hand the tool list to a model and let it choose, like in Module 02.
4. Set it up
You need Python 3.11 or newer and git. There’s no model and there are no API keys.
Clone the repo and create a virtual environment from the repo root (you can reuse the clone from the earlier modules):
git clone https://github.com/likarajo/ai-agent-stack.git
cd ai-agent-stack
python3 -m venv .venv
source .venv/bin/activate
pip install -r 04-mcp/requirements.txt
That installs the official MCP Python SDK (mcp, version 2.0 or newer), httpx and pytest. I ran it with mcp 2.3.0.
Run everything from the repo root, so the server can import the shared/ package.
5. Run it
You only need one terminal. The client starts the server itself:
PYTHONPATH=. python 04-mcp/client/demo.pyIt prints the tools it discovered, the tool it called, and the raw result (shortened here):
{
  "tools": [
    "search_issues_tool",
    "get_issue_tool"
  ],
  "call": "search_issues_tool",
  "raw": "{\n  \"count\": 4,\n  \"issues\": [\n    {\n      \"id\": 101,\n      \"title\": \"Login page hangs after SSO redirect\", ...
}
The raw field is the tool result as text, exactly as it came over the protocol. Inside it are the four issues: 101, 102, 105 and 107.
The demo only uses tools. To see the resource and the prompt too, save this as explore_mcp.py in the repo root and run PYTHONPATH=. python explore_mcp.py:
import asyncio, json, os, sys
from mcp import ClientSession, StdioServerParameters
from mcp.client.stdio import stdio_client

async def main():
    params = StdioServerParameters(
        command=sys.executable, args=["04-mcp/server/issue_tracker.py"],
        env={**os.environ, "PYTHONPATH": "."}, cwd=".")
    async with stdio_client(params) as (read, write):
        async with ClientSession(read, write) as s:
            init = await s.initialize()
            print("server:", init.server_info.name, "protocol:", init.protocol_version)
            print("resources:", [str(r.uri) for r in (await s.list_resources()).resources])
            print("prompts:", [p.name for p in (await s.list_prompts()).prompts])
            prompt = await s.get_prompt("login_issue_prompt")
            print("prompt text:", prompt.messages[0].content.text)
            res = await s.read_resource("issues://open")
            print("open issues in resource:", len(json.loads(res.contents[0].text)))
            missing = await s.call_tool("get_issue_tool", {"issue_id": 9999})
            print("get 9999:", missing.content[0].text)

asyncio.run(main())
server: northwind-issue-tracker protocol: 2025-11-25
resources: ['issues://open']
prompts: ['login_issue_prompt']
prompt text: Which open issues mention login? Use search_issues_tool.
open issues in resource: 6
get 9999: {
"error": "Issue 9999 not found"
}The resource returns all 6 open issues, not just the login ones. And asking for an issue that doesn’t exist gives a clear error back, the same contract as in Module 01.
6. How it works inside
There are two small files to read, in this order:
-
04-mcp/server/issue_tracker.pyis the server, built withMCPServerfrom the official SDK. Each decorator registers one thing a host can discover:mcp = MCPServer( name="northwind-issue-tracker", instructions=( "Tools for the Northwind portal issue tracker. " "Use search_issues for questions like 'Which open issues mention login?'." ), ) @mcp.tool(description="Search issues by state and free-text query.") def search_issues_tool(state: str = "open", text: str = "") -> dict: issues = search_issues(state=state, text=text) return {"count": len(issues), "issues": issues} @mcp.resource("issues://open") def open_issues_resource() -> str: """Resource: current open issues as JSON.""" return json.dumps(search_issues(state="open", text=None), indent=2) @mcp.prompt() def login_issue_prompt() -> str: """Reusable prompt template for the article's example question.""" return "Which open issues mention login? Use search_issues_tool."Notice there’s no hand-written JSON schema like in Module 02. The SDK builds the tool’s input schema from the Python type hints.
mcp.run()at the bottom serves it over stdio, which is the usual transport for local servers. -
04-mcp/client/demo.pystarts the server as a child process and runs the session:initialize, thenlist_tools, thencall_tool:params = StdioServerParameters(command=sys.executable, args=[str(SERVER)], env=env, cwd=str(ROOT)) async with stdio_client(params) as (read, write): async with ClientSession(read, write) as session: await session.initialize() tools = await session.list_tools() result = await session.call_tool("search_issues_tool", {"state": state, "text": text})
Underneath, the server still calls the same shared/issue_store.py as the earlier modules. MCP is the plug, not the data.
7. Test it
The tests don’t need a model:
PYTHONPATH=. pytest 04-mcp/tests -q -rA... [100%]
=========================== short test summary info ============================
PASSED 04-mcp/tests/test_mcp_smoke.py::test_tools_registered
PASSED 04-mcp/tests/test_mcp_smoke.py::test_search_tool_direct
PASSED 04-mcp/tests/test_mcp_smoke.py::test_stdio_client_roundtrip(-q -rA is the quiet progress plus short pass summary the module README uses. Pass lines may vary slightly by pytest version.)
The three smoke tests check that both tools are registered on the server, that calling search_issues_tool directly finds at least one open login issue, and a full stdio round trip through the demo client. That last one starts a real server process, which is why this module’s tests take about a second.
What’s next
An MCP server is one piece. A real setup also needs skills, commands and settings, and somebody has to install all of it. Module 05 adds plugins: one manifest that bundles this MCP server with a skill and two commands, and one install step that wires it all up.